How to Install and Configure Unifi Controller on DigitalOcean⚓
Summary⚓
This guide assumes that a droplet has already been created on DigitalOcean for the Unifi Controller. It's also assumed that Ubuntu is installed and up to date. The guide will begin having already used SSH to log into the droplet.
Create New User⚓
Most Linux machines in the world have root as the default user. The first line of defense is to create a separate login account with the same privileges and then disable root.
Start by creating a new user – for simplicity, for this exercise, our username will be ‘unifiadmin‘:
This command will have you set a password for the new user, and you can also optionally enter in some additional information such as their real name and contact info.
Next give root (sudo group) privileges to the newly created user:
This new user will now be able to use the ‘sudo’ command to run commands as root.
At this point, we have created our new user, but we haven’t yet disabled root – we will do that in a moment. First, we will enable private key authentication as a second line of defense.
Modify SSH Settings⚓
The next step is to modify the SSH settings so that we will both disable root user access and password authentication. Start by editing the SSH configuration file:
Now scroll down until you find the line that says:
And change ‘yes’ to ‘no’:
This disables root user login. Next scroll down further and find:
And again change ‘yes’ to ‘no’:
This disables password based authentication. (Private key authentication should already be enabled by default – you can verify this by ensuring that PubkeyAuthentication is set to ‘yes’ in the SSH config file).
Press CTRL+X followed by ‘Y’ and ‘Enter’ to save and exit.
Danger
This next command commits these changes. If you lose connectivity because you made any mistakes, you should just destroy the Vultr server and start over. ALSO – keep this original PuTTY session open as you go through the next few steps…even after we restart SSH, this session will still be connected, so if you can’t connect in with the private key, you still have the opportunity to make changes.
Restart SSH with:
Now that we can log in with our secure key, let’s take our SSH security even further by changing the default SSH port from 22 to something non-standard.
Edit the SSH config file again with:
Find the line that says:
And change it to:
You can use any port number for your SSH connection, but I typcially use port 2222 when I change to something non-standard. CTRL+X followed by ‘Y’ and ‘Enter’ to save and exit Nano.
Restart SSH again with:
Enable UFW Firewall⚓
At this point, we have now secured our SSH connection pretty well. Now, let’s secure our server even more by using some firewall rules to lock everything down.
Ubuntu uses the UFW firewall, however it is not enabled by default. First, we are going to add all of the firewall rules that we need to connect to UniFi, and then we will turn it on.
First, let’s allow our new SSH port and lock it down so that connections to this port are only allowed from our IP address:
In this example, if your IP address is 1.2.3.4, and your SSH port is 2222, the command should be:
Next, let’s open up access to the UniFi GUI. Important note here – you don’t actually HAVE to open up this port to the outside world if you are instead using Ubiquiti’s Single Sign On (SSO) account to access your UniFi Controller through https://unifi.ubnt.com. BUT – you will have to use this port at least once to enable cloud access in UniFi. You can either wait to do your firewall rules until after cloud access has been enabled, or you can disable this rule afterwards.
Next, there are a couple of ports that we need open to the whole wide world. These are the STUN port and the UniFi inform port:
Note that the STUN port running on 3478 is UDP.
If you are going to be using a guest portal with UniFi, you will also want to open these ports:
We’re also going to need to open up ports 80 and 443 for Let’s Encrypt. If anyone browses directly to those services, they will get a connection refused response.
At this point, we will now turn on our UFW firewall and take a look at the rules that we created.
When prompted whether or not to proceed, choose yes.
Let’s take a look at our rules:
You should see something similar to this (note that I did not add the ports for guest portal access in my example):
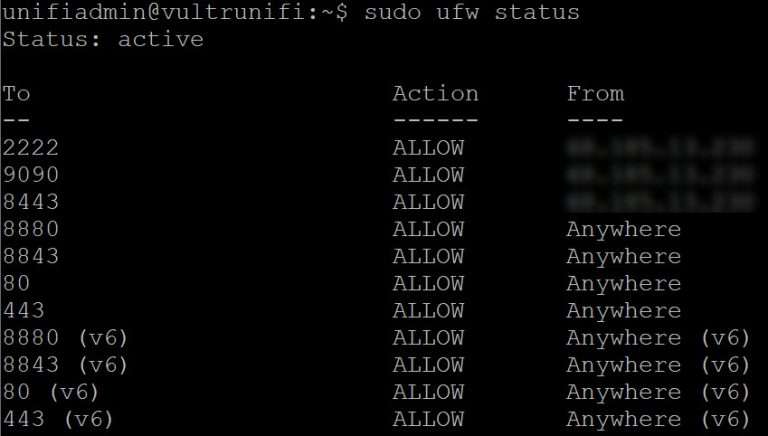
The firewall is now running, and if you test your PuTTY connection again, you should still be able to connect. But – if you test connecting in on the standard SSH port 22, you will not be able to connect.
Update Server⚓
Now that access to the server is secured, let’s run our system updates.
It’s possible that no updates will be needed, but if you are asked whether or not to proceed on any of these steps, just answer Y.
Once the updates are done, let’s give the server a reboot:
The server should only take about 2 minutes to reboot, and then you can reconnect.
Install Java 8⚓
Install OpenJDK-8
That’s it (actually, this install is much easier than the Oracle one, and still works great).
Install Unifi⚓
Finally, we’re going to install UniFi. There are a few different ways to download and install UniFi, but for me, the easiest way to install and maintain the UniFi package is to use apt, so that is what we will do in our example.
First, we need to add an apt source for UniFi. To do this, run the following commands:
echo 'deb http://www.ubnt.com/downloads/unifi/debian stable ubiquiti' | sudo tee /etc/apt/sources.list.d/100-ubnt-unifi.list
These commands set up the apt repository for UniFi and install the trusted GPG key. Now let’s install UniFi:
You should now have installed the latest stable version of UniFi.
Migrate Existing Unifi Controller to DigitalOcean⚓
The information below will likely vary from more current versions of the Unifi Controller, but will still likely apply, at least at the time of this writing.
Backup the configuration on the source UniFi Controller by navigating to the Settings, Maintenance, Backup and clicking the Download Backup button.
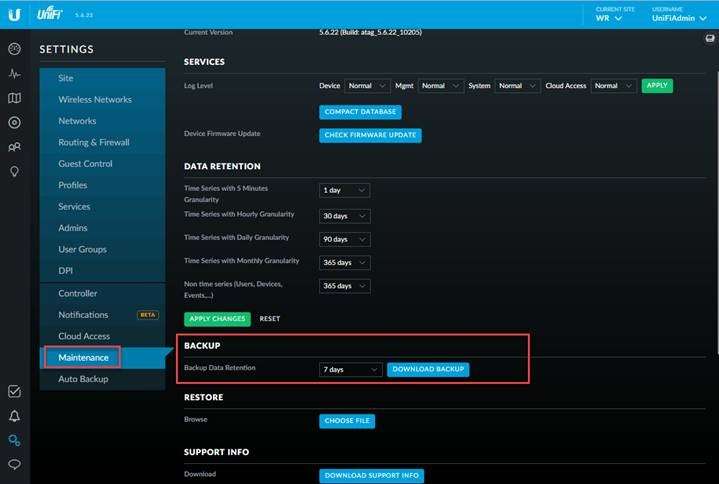
This process will create a file with a UNF extension. Copy this file to the target controller software that was just installed.
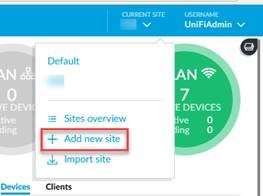
Create a new site on the new controller that is named the same as the old site (if one was used) by clicking the Current Site**drop-down menu and selecting the **Add New Site selection.
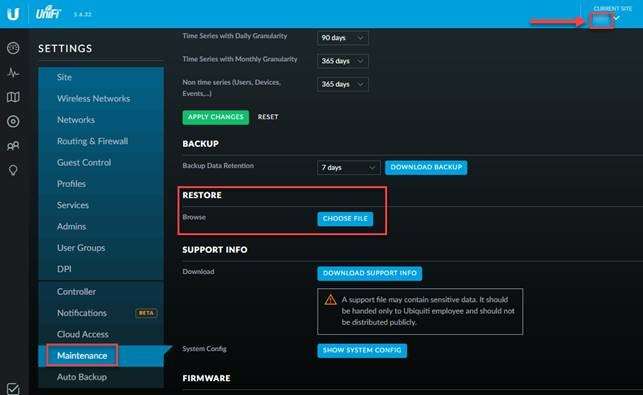
Once the new site has been created the backup can be restored. Ensure that the correct site is selecting in the Current Site**drop-down menu in the upper right-hand corner of the web page. Navigate to **Settings, Maintenance, Restore and click the Choose File button. Browse to the backup transferred from the source controller and follow the prompts to restore the configuration.
Once the controller has been restored the configurations for the Wireless Networks and the inventory of devices will be configured in the new UniFi Controller software. The access points that are connected to the same network should automatically re-associate to the new controller software “auto-magically.”
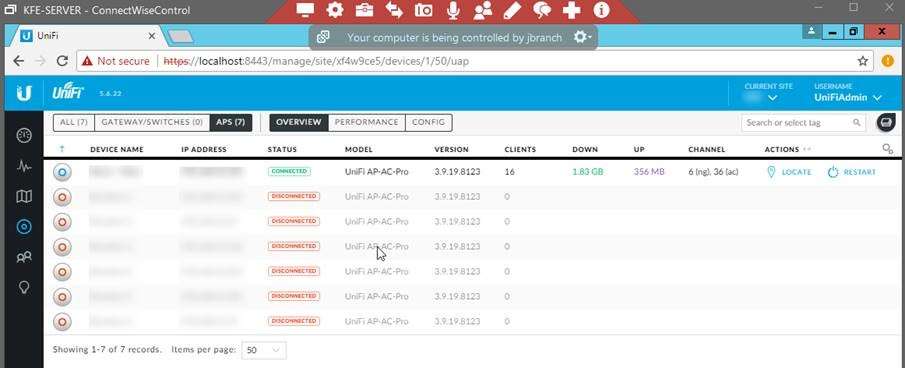
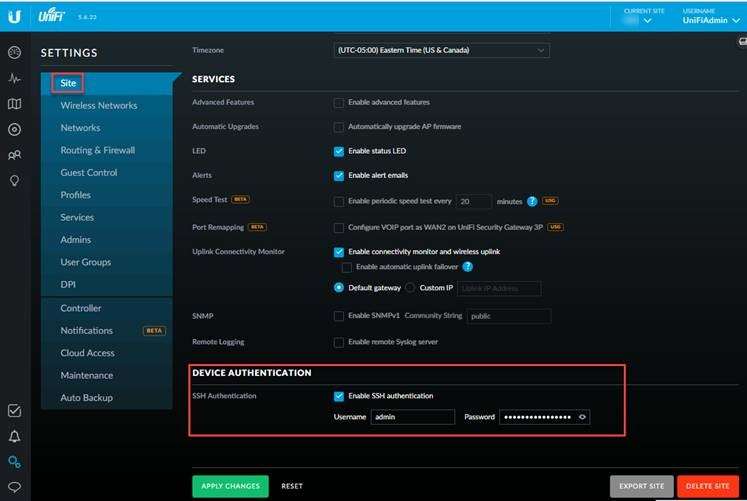
If the access points are on a different network you may need to log in to them using ssh and manually re-associate them to the new controller. The device authentication credentials can be found by navigating to Settings, Site, Device Authentication.
Use ssh to remotely connect to the access points using the Device Authentication credentials to log on. Issue the set-inform command using the following syntax:
set-inform http://droplet-ip-address:8080/inform
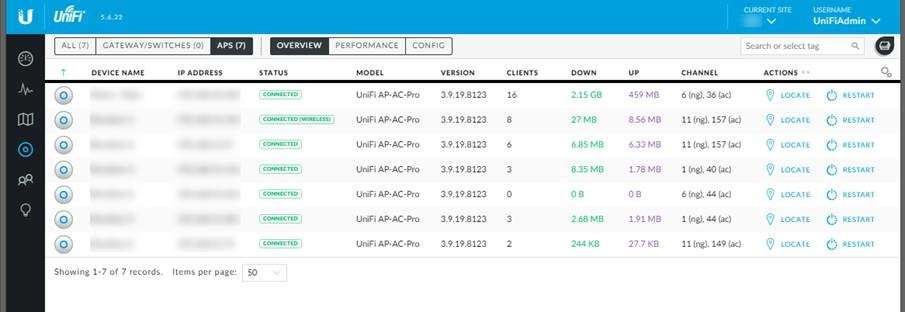
Understand that you may need to issue the command multiple times to complete the re-association. Once complete you will see the remaining inventory now reports to the new UniFi Controller.
NOTE: The existing controller will need to be shut down BEFORE applying the set-inform command. If not, the devices will continue to look for the existing controller instead of the new controller.
References⚓
https://crosstalksolutions.com/definitive-guide-to-hosted-unifi/
https://www.sikich.com/insight/migrate-ubiquiti-unifi-controller-to-a-new-server/